
 Français
 Español
 Products
 About Us


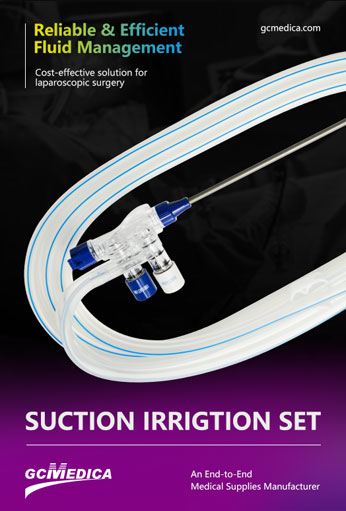
A suction irrigator combines fluid delivery and continuous suction to clear a surgical or wound site of debris, blood, and excess irrigation fluid. By simultaneously irrigating and aspirating, it maintains a clear visual field, minimizes tissue maceration, and reduces operative time. Suction irrigators are widely used in general surgery, orthopedic procedures, arthroscopy, wound debridement, and endoscopic interventions. Proper understanding of its components, setup, and technique ensures efficient use and minimizes complications such as tissue trauma, fluid overload, or cross‑contamination.
Below is a table summarizing the main stages of suction irrigation use during a procedure:
| Stage | Description | Purpose | Equipment/Settings |
|---|---|---|---|
| Preparation | Assemble device: connect irrigation tubing to fluid source and suction tubing to vacuum outlet. | Ensure all connections are secure and leak‑free. | Irrigation line, suction tubing, Y‑connector, clamps |
| Priming | Open irrigation clamp to allow fluid to fill tubing; activate suction briefly to remove air. | Eliminate air pockets that can compromise flow. | Normal saline or fluid per protocol; low suction |
| Positioning | Place irrigator tip at the desired site, maintaining a 1–2 cm distance from tissue surface. | Optimize fluid jet impact without causing trauma. | Tip type (straight or side‑port), adjustable angle |
| Irrigation Cycle | Depress foot pedal or hand trigger to release a pulsatile or continuous fluid stream. | Loosen debris and dilute contaminants or blood. | Flow rate 50–200 mL/min (adjustable) |
| Concurrent Suction | Maintain suction paddle engaged to aspirate loosened material and excess fluid simultaneously. | Clear operative field and prevent fluid pooling. | Suction pressure 100–150 mmHg |
| Field Inspection | Pause irrigation periodically and inspect tissue with suction tip withdrawn slightly. | Assess hemostasis and tissue integrity. | Good ambient lighting; magnification if needed |
| Repeat Cycles | Alternate irrigation and suction in 200–500 mL aliquots until the field is clear. | Achieve thorough cleansing without over‑hydration. | Total volume limits per procedure protocol |
| Device Removal | Turn off irrigation, release suction, and withdraw tip carefully while aspirating residual fluid. | Prevent intrasite fluid retention or aspiration risk. | Final suction flush, gentle withdrawal |
| Post‑Procedure | Disconnect tubing, dispose single‑use components, and sterilize reusable parts as per policy. | Eliminate infection risk and prepare for next use. | Autoclave or high‑level disinfection for reusables |
In the preparation phase, the surgical team verifies that the irrigation fluid (often isotonic saline) is warmed to body temperature to prevent hypothermia and that the suction system achieves the recommended negative pressure, typically between 100 and 150 mmHg. All tubing connections—irrigation line to the fluid bag and suction line to the vacuum source—must be secure and free of kinks.
During priming, introducing fluid into the irrigation lumen expels air, which could otherwise produce emboli or intermittent flow. The user momentarily engages suction to confirm patency. For positioning, the irrigator tip is held at a controlled distance from tissue—too close and it can damage delicate structures; too far and irrigation efficacy diminishes.
The irrigation cycle can be continuous or pulsed. Pulsatile irrigation helps dislodge adherent debris more effectively, while continuous flow maintains a steady wash. Flow rates are adjusted based on the wound depth and size; high‑pressure irrigation is reserved for deep or heavily contaminated wounds, whereas low pressure protects fragile tissues. Simultaneously, the suction control (via foot pedal or hand‑activated lever) evacuates fluid and particulate matter, preventing accumulation.
Intermittent field inspection ensures the irrigator has cleared blood clots and debris without causing tissue blanching or edema. The surgeon alternates cycles of irrigation and suction, typically in 200–500 mL increments, until the field is macroscopically clean. Care is taken not to exceed safe total fluid volumes, which vary by procedure type and patient tolerance.
Finally, device removal involves turning off the irrigation pump, releasing suction, and gently withdrawing the tip while aspirating any residual fluid to avoid aspiration into adjacent cavities. After the case, all single‑use components are discarded; reusable parts undergo sterilization per institutional protocols.
Proper use of a suction irrigator enhances visibility, reduces procedure time, and can lower infection rates by effectively removing contaminants. Mastery of the device settings and technique is essential for safe and effective surgical irrigation.
| Suction Irrigation System > |